FileBrowser Pro for Mac UserGuide

Follow Our Simple macOS Step by Step Guides

How to add a location using FileBrowser Pro for Mac

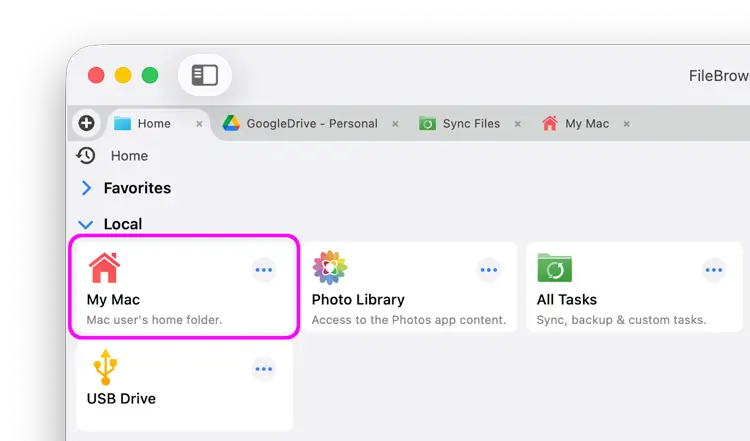
Set your Home Folder

Simply click "My Mac" on the home screen, select your home folder on your Mac and click "Open".

You can re-link this by clicking the Actions menu on the "My Mac" location on your home screen and selecting "Unlink".

Connect to Other Computers and Drives

Add other locations such as network drives, USB, other computers or your cloud storage, by simply clicking "Add Location" from the home screen and follow the setup wizard.

FileBrowser Pro for Mac has an integrated SMB, FTP and WebDAV client.

For more specific help on getting connected see the following guides:

Connect to other computers via SMB from Mac

SMB 1, 2 & 3

Connect to WebDAV Servers with your Mac

WebDAV

Browse FTP & FTPS Servers with your Mac

FTP, FTPS & SFTP

Connect to your Synology on your Mac with File Browser Pro

Synology NAS

Connect to your QNAP NAS from your Mac with File Browser Pro

QNAP NAS

Using Tabs in FileBrowser Pro for Mac

A document explorer app using tabs like a browser

Having multiple Tabs open can speed up your productivity. Simply copy files from one tab to another.

Create a new Tab by clicking the "+" icon next to the first Tab and browse any of your storage locations.

You can even drag and drop files between your open Tabs.

Pin your favourite connections to the home screen of FileBrowser

Add Favourites to your Home Screen

Add your Favourite locations to the top of the Home Screen, speeding up your workflow. Drag Favourites to re-order them.

Create new windows in FileBrowser Pro for Mac

Create a New Window

Open as many FileBrowser Pro windows as you like simply hold down "CMD" and press "n" for a new window.

Drag and drop files into folders using your Mac

Drag and Drop Files Between Windows

Single File Drag Drop

Click and drag a file into another FileBrowser Pro window, tab or into Finder on your Mac.

Drag Drop Multiple Files

Click "Select" in the top right corner to enter multi-select mode. Click cells to select them or click the check marks to multi select. Use shift-click to select a range of files. Then drag one of the selected files into either a new window or tab. See the Multi-select section.

Please Note

If you drag files to somewhere on the same location you will move the files.
If you drag files to another location the files will be copied.

Access folder view options in FileBrowser Pro on your Mac

Folder View Options

FileBrowser Pro for Mac remembers the View mode, Sort order and even Zoom level, per folder. Perfect for Photos or Files.

List

Single column showing file details.

Grid

Grid of icons or image thumbnails with file details.

Grid No Borders

Grid of icons or image thumbnails with no file details.

Columns

Two or three columns showing file details.

Gallery

Large preview, with menu off to the side.

In Grid and List view use the pinch gesture to zoom the thumbnails, this can also be done via the slider in the sort menu.

Sort

Sort by one of the options below in either ascending or descending order, you can also sort folders first.

  • Sort by Name
  • Sort Alphabetically
  • Sort Folders First
  • Sort by Date
  • Sort by Size
  • Sort by Type
  • Sort by Rating
Select the files actions menu in FileBrowser Pro on your Mac

File Actions Menu

Simply right click a folder or file to access the file actions menu.

View in Quicklook

Preview the selected file and allow it to be launched by your editor application.

View / Edit in...

Open the document in its editor.

Get Folder Info

This displays a popup showing a summary of file & folder size and content categories.

Markup / Print

This views files using an alternate viewer with annotation features. clicking the menu button in this mode allows you to print your document.

Open as Text

Open the file and treat it as containing only text.


Copy

Copy a file.
How to use multiple select

Move

Move a file to selected folder.

Duplicate

Make a duplicate of the current file.

Rename

Rename the file or bulk rename multiple files.
How to use bulk rename

Delete

Delete a file or folder.


Share

Share your file to another app, including AirDrop, Mail, Messages etc.

Show in Finder

Show the current file in macOS Finder.

Google Drive Share

If you have shared a folder from Google Drive you can manage that list here.

Export to Finder

Export a file to a folder of another app.
Export a Folder to Finder

Zip this Folder

Create a Zip file of the selected folder.

Or in multi select mode, if you have several files selected, you can also create a zip file.


Create PDF

Convert an Image into a PDF file.
Create PDF

Queue Audio

Add a music track to the now playing list.

Create Slideshow

Create a slideshow from the selected folder.
How to Create a Slideshow on Mac


Open in New Tab

Open the current file in a new FileBrowser Tab.

Open in New Window

Open the current file in a seperate FileBrowser Window.

Create a Sync Task

Setup a Sync Task to copy files and folders to Filebrowser Pro.
How to Sync Files on Mac

Create a Backup Task

Setup a Backup Task to copy files or folders from one destination to another.
How to Backup Files on Mac

Run a Custom Task

Run a pre-built Custom Task.
See Custom Tasks.


Create a File Link

Create a server path link for SMB or FTP servers.

Create file links that you can email or paste into a folder.

Add a Bookmark

Add a Bookmark link to the current file.
Read more about Bookmarks.

Add to Favourites

Add the current folder to the favourites section on the homepage.

Access your USB drives using your Mac

USB Drives

Simply plug in your USB drive and follow the instructions below:

  • From FileBrowser Pro's Home screen click "Add Location"

  • Then click "USB Drive"

  • From here, click "Select Location" and select your USB device.

  • You can also rename it, at this point, click "Save" and thats it.

You can add multiple USB drives and FileBrowser Pro for Mac will remember them.

Easily Import files into FileBrowser from other apps

Import from Finder

Easily Import files from finder to remote locations such as Google Drive or a Windows PC.

  • In the folder you want to Import the file into, click "Import from Finder" from the toolbar menu icon and finder will appear.

  • Select the file you wish to Import and it will be copied to the current folder.

Export files to other apps on your Mac

Export to Finder

Easily export a file or folder to finder using the steps below:

  • Click "Export to Finder" from the file menu icon and navigate to the macOS folder.

  • Tap "Save" to export the file or folder to that location.

Also see Import

How to select multiple files and folders in Filebrowser Pro on your Mac

Multi File Select Mode

Multi-file select isn't just for copying or deleting files. You can also use it for Bulk Renaming, zipping files, running Custom Tasks or creating PDFs.

Step 1

Click and hold a file or a folder to enter multi select mode or click the "Select" button on the top toolbar.

Step 2

Then select additional files and or folders by holding down "CMD" and left clicking each item. Or select individual files by clicking the check circle.

You can also select groups of files by clicking the first file then hold down "Shift" and left click the last file, all files in between become selected.

Step 3

Then click "Copy" or click the toolbar to access more options such as Rename, Share, Create Zip and Email attachments.

  • Cancel multi-selection mode, press "Esc" or click the "Cancel" button.
  • To complete a copy or move, navigate to where you want your files or folders to be and click the toolbar button "Paste X files here...".

How to Bulk Rename Files on Mac

Let's show you how to rename hundreds of files at once on your Mac or in the Cloud, with our advanced bulk rename tools its never been easier.

Add Text to Multiple Files at Once on Mac

Add text to the beginning or the end of all the selected files. For example "Presentation_Filename.pdf" or "Filename_Presentation.pdf".

bulk rename tools for your Mac

Find and Replace Text on Multiple Files on Mac

Find and replace words within your file names. For example you could bulk rename all ".jpeg" files to ".jpg" files or replace "_DCS" as the prefix for all your files and change it to "IMG_".

This method would preserve existing image numbers in the filename.

How to find and replace file names in FileBrowser Pro

Add a Custom Format to Multiple Files on Mac

Add an Index, a Counter or a Date before or after your existing filenames by leaving the Custom Format box empty. For example:

  • "IMG_0.jpg" Index
  • "IMG_0000.jpg" Counter
  • "IMG_2018-09-27 at 15.46.36.jpg" Date

If you use the Custom Format box, existing file names will be replaced with the text. For example if you want to rename all your photos that were previously something like this:

  • "IMG_0156.JPG"
  • "_DSC0267543.JPG"
  • "Family_Holiday_9342.JPG"

You can rename them all to be "Holiday_(date).JPG", replacing any names they previously had.

batch rename utility for Mac

Rename Photos Using their EXIF Properties

Add EXIF Properties to your filenames, such as Make, Model, Description or Comment. You can also incorporate a date in any format. These options are great for professional photographers. For Example:

  • Nikon-D850-ISO-200-08-12-2024
  • DSC203452-2024-12-08
  • Bright Sunset Rome-2024-12-08
EXIF Properties supported: OriginalName / Description / Comment / Make / Model / Software / FNumber / FocalLength / ExposureTime / ISO / ColorSpace / ExposureProgram / MeteringMode / Pixel Dimensions / Date - Create the format that suits your needs for example: DD-MM-YYYY
Sync folders from cloud storage or other computers to your Mac with FileBrowser Pro Sync tasks
Create Sync Tasks to FileBrowser Pro for Mac

Create Sync Tasks on macOS

Sync files and entire folders from any location (computers, servers or the cloud) directly to FileBrowser Pro on your Mac. To create a Sync Task follow these steps:

Step 1

Right click a folder or file and on the context menu select "Create Sync Task"

Step 2

Set the Sync Frequency you want the file or folder synced to your Mac

Exclude list: you can exclude files or folders with matching text. Example: "data" would exclude "data.jpg" and "data.txt" or ".doc" would exclude all doc files.

File Types: include only files matching these file types. For example: "jpg,jpeg,png,tiff"

Once set, tap "Confirm". The content will be downloaded to FileBrowser Pro under the new location 'All Tasks' on the home screen.

This location is not accessible outside of FileBrowser Pro.

You may set up as many Sync Tasks as you wish.

Backup folders from any location to another location using FileBrowser Pro Backup tasks on your Mac
Create Backup Tasks on macOS

Create Backup Tasks on macOS

Create a Backup Task to Backup files and folders from one location to another, including your computer, network drive or cloud storage.

Follow these steps:

Step 1

Right click a folder or file and select "Create Backup Task" on the context menu.

Step 2

Navigate to the location you want to back up the selected file to.

Step 3

Once in the correct folder, click the "Backup to (Your folder)" option at the top of the dialog. Then click the "Confirm" button.

You can check on your Backed up files under the "All Tasks" section on the home screen.

Create Custom File Tasks on macOS

Create Custom Tasks

Create file based workflows to speed up your daily tasks.

Step 1

To create a new Custom Task tap the "All Tasks" location on the home screen.

Step 2

Then select the "custom" tab

Step 3

Tap the plus icon in the top toolbar and select "Create Custom Task". Then use our custom task builder to create your task.

Custom Tasks can be as simple or as complex as you like.

How to create documents in a specific folder on your Mac

Toolbar Actions Menu

Paste

Paste to complete a copy or move action.


Rename Files

Rename the file or bulk rename multiple files.
How to use bulk rename

Create Zip File

Compress all selected files into a single zip file. You can password protect your zip file if required.

Create PDF File

Convert multiple images into a single PDF.
Create PDF

Create Slideshow

Create a slideshow from the images or folders selected.
How to Create a SlideShow on Mac

Share Files

Share multiple files to another app, including AirDrop, Mail, Messages, etc.


Create a Folder

Create a new Folder in the current location.

Create a Document

Create a new PDF, txt, docx, pptx, xlsx, Pages, Numbers or Keynote document.

Create a Text File

Create a new text file and edit its contents.


Import from Finder

Use Finder to choose a file or folder to import into the current folder.
How to Import Files from Finder

Download from URL

Download any file from the web. Just copy the URL and paste it into FileBrowser to save a local copy.

Paste macOS Clipboard

Paste an image or text thats on the macOS Clipboard into a new file.


Record Audio

Record a voice memo to the current folder.

Create Backup Task

Setup a Backup Task to copy files or folders from one destination to another.

Create Custom Task

Create a Custom Task using our workflow builder.
How to Create a Custom Task

Run a Custom Task

Run a pre-built Custom Task.

Easily add Bookmarks to folder locations or PDF files using FileBrowser Pro

Bookmarks

Bookmarks are a great feature of FileBrowser Pro. You can use them in two ways: Folder Bookmarks & Document Bookmarks.

Folder Bookmarks

If you have folders on your computer that you use all the time such as My Documents, Photo Library or Movies, create a bookmark to them. These will become your shortcuts and save you time navigating through folders to get to where you want.

Create a Bookmark
  • Click the Bookmark icon and click the + icon.

  • You can give it a more memorable name then click add.

Open a Bookmark
  • Click the Bookmark icon and your existing Bookmarks are listed.

  • Just select one and FileBrowser Pro will connect and browse to the Bookmarked folder.

Bookmark folder locations for quick access on your Mac using FileBrowser Pro
Document Bookmarks

If you are reading a long PDF, whether it's a book or a presentation or a legal document, add a bookmark. When you click that bookmark, FileBrowser Pro will remember the location in the file and open it where you left off.

From this page you can add a Bookmark:

  • Click the Bookmark icon in the toolbar

  • Then click '+', for rapid navigation to this file next time.

See the File Actions Menu

FileBrowser Pro recently accessed folders and files
History

FileBrowser Pro for Mac automatically remembers the most recently visited files and folders, and with a single tap you can re-open a file or rapidly browse to a folder.

Tap the History icon in the breadcrumb bar to display the files and folders that you have recently interacted with.

view your full History in the Bookmarks menu

You can also view your History in the Bookmarks menu. From here you can clear individual items or clear your entire history.

  • Tap the Bookmarks icon in the top toolbar
  • Select the "History" tab.
  • Tap "Edit" and clear individual files or folders. To clear your entire History tap "Clear History".
Annotate your PDFs or Images on Mac

PDF and Image Annotation

Annotate your PDFs to make comments, highlight text and use the drawing tools. Once you have finished annotating your document or image FileBrowser will save the new file and keep the original as a backup.

  • Right click a file and select "Markup File/Print" on the file context menu.
  • Click the annotate icon in the top right, this will display the annotation menu.
  • You have the following tools:
    • Pen
    • Pencil
    • Eraser
    • Text
    • Highlighter
  • After you have finished annotating your photo or PDF simply click "Done" Then "Close".
  • You will be prompted to save the file with a another name, so it wont overwrite your original.
Easily create multipage PDFs on iOS
Create and Merge PDFs on macOS with FileBrowser Pro

Create PDF

You can select a combination of images or PDF files to merge or create one PDF.

Save Image as PDF

  • Select the context menu on an image file then select "Create PDF File"
  • This will convert a single image into a PDF file

Merge PDFs

  • Select multiple PDFs in a folder and then tap the menu icon (top right). Select "Merge PDFs".
  • Tap "Merge PDFs" and the new PDF will be saved into the current folder. You can save the PDF to another location by unchecking "Save to this Folder" and the file will be copied to your clipboard.
Tip: Tap the re-order button to change the order of the files.

Create Multi-Page PDFs from Photos

  • Select multiple images in a folder and then tap the menu icon (top right). Select "Create PDF File".
  • Select the number of images you want per page.
  • Select your paper orientation, portrait or landscape.
  • Choose the quality by selecting DPI.
  • Optionally choose an Exif property to add to your file labels.
  • You can also add the filenames underneath each image for easy reference.
  • Tap "Create PDF File" and the new PDF will be saved into the current folder. If you want to save the PDF to another location uncheck "Save to this Folder" and the file will be copied to your clipboard.
View CBR or CBZ Comic book files on your Mac with FileBrowser Pro

Comicbook Viewing

View your comics collection stored in CBR or CBZ files. View images within any ZIP or RAR file.

  • Simply click the comic file and FileBrowser Pro will open it in the comic viewer.

  • Just use the left and right arrow keys to turn the pages.

  • Tap "Done" to exit the comic viewer.

Create and save Slideshows on your Mac

Create Slideshows on Mac

Create Slideshows in FileBrowser

Create slideshows and save them for later use. Access them from FileBrowser Pro's home screen of the app, simply select "Slideshows".

To create a Slideshow do the following either:

  • Right click a folder and select "Create Slideshow" on the context menu.

This will create a slideshow of all the images inside that folder and its subfolders.

  • Select multiple images, then click the Toolbar Actions menu and select "Create Slideshow".

This will create a new Slideshow with only the images you have selected.

To change the delay, transitions and order in the Image Viewer click the Actions Menu and select "Slideshow Settings".

How to access the your Image Actions Menu in FileBrowser Pro on your Mac

Image Viewer Actions Menu

This can be accessed on the top toolbar when viewing an image.

Image Properties

Display your image properties (EXIF data) such as dimensions, color mode, latitude, camera model etc.

Markup

Annotate your images with markers or text tools, then you can save it as a new file.

Rotate Image

Rotate the current image left or right.

Convert

Convert image into JPG, HEIC or TIFF format.

Slideshow Settings

Change delays and transitions.
How to Change Slideshow Settings on Mac

Share...

Share your file via mail, AirDrop, or iMessage etc.

Refresh

Refresh the current view.

Browse and sort your Photos by name or date, even change the view modes.
Browse your Mac Photos Library

You can access the photos in the Mac Photo app. Click the "Photo Library" location.

Selecting Multiple Images

Select multiple images in the image view by clicking the Tick icon in the toolbar. Selecting them turns the tick green like the screenshot. When you have finished cick "Done" you will be returned to the folder view in select mode where you can choose to copy, move, delete, or share those images.

Zoom

When in the image viewer, use pinch to Zoom. A double click will set the zoom level back to its original size.

Star rate your photos with XMP on your Mac with FileBrowser Pro

Tag Your Photos with XMP on Mac

Update or create new XMP sidecar files for images and rapidly update rejection and star rate your photos.

Step 1

Select an image to enter full screen mode, then click the 'i' information icon in the top toolbar.

Step 2

You can star rate or reject your photos using the icons in the top of the information panel.

You can also check all your EXIF data to your photographs such as Exposure time, shutter speed etc.

Star rate your photos with XMP on your Mac with FileBrowser Pro

IPTC

IPTC Photo Metadata tags allow you to describe photos using metadata properties. You can add precise and reliable data about your photos, such as copyright, source, location.

You can edit IPTC on multiple photos at once using Custom Tasks.

To edit IPTC on a single file, follow the steps below:

Step 1

Select an image to enter full screen mode, then click the 'i' information icon in the top toolbar.

Step 2

Click the "Edit" button top right to view your IPTC Properties.

Step 3

Here you can edit your IPTC information for the current photo.

Not all photos support IPTC Metadata.

Play movie files

Playing Movies

Simply click the Movie file you want to play and it will auto start, click in the center of the screen to pause the video. Once paused you can click anywhere on the screen to bring up the additional controls.

Subtitle Support

If your movies have embedded subtitles, simply select the ones you want to display.

Video Language Support

If your movies have embedded audio languages, simply select one from the list.

Supported video formats

FileBrowser can play all video formats supported by Apple, including the following:

  • MP4
  • MOV
  • M4V
  • 3GP
  • 3G2
  • AVI

(AVI files containing DIVX/MPG and other non-Apple formats are not supported).
DRM Protected Movies from iTunes
Apple prevent movies purchased from iTunes being streamed to non-Apple apps.

Play Music

FileBrowser can play most music file types including Hi-Res FLAC. Featuring several play modes including:

Album mode

Album Mode

Play selected track and the remaining ones in the folder.

Single mode

Single Mode

Selecting a track from a folder queues and plays it once.

Repeat mode

Repeat Mode

Play selected track and all others in the folder continuously.

Shuffle mode

Shuffle Mode

Play selected track and others in the folder randomly.

Queue Tracks

You can play queue tracks to play by pressing the context menu on a track and select "Queue Audio". This will place it in the now playing queue.

Edit Track Order

Re-order queued tracks, Simply click "Edit", then drag the tracks into the order you want and click "Done".

Podcasts & Audiobooks

  • You can rewind or fast forward 15 secs at a time
  • Speed Up and slow down track playback. Great for audiobooks.

MusicStreamer for Mac

For a dedicated music player on macOS, try our MusicStreamer app

Play your existing music files, Learn more about our iTunes Alternative for macOS

Download MusicStreamer for Mac from the macOS App Store

Import and Export Configuration files

If you already have one of our FileBrower apps on your iPad or iPhone, simply export your confuration file to setup FileBrowser Pro for Mac.

All your connection details, preferences and app settings will be included. If you are using FileBrowserGO or FileBrowser Professional, you can choose to encrypt the settings file with AES encryption. With this option, passwords will also be stored in the configuration file. This encryption feature also provides additional security if you are storing your configuration file as a backup.

Any cloud accounts such as Googledrive or Dropbox will be added but you will need to re-link them on your new device.

Show me how to use Configuration files