- Connect to Mac
- Connect to Windows
- Connect to NAS Drives
- Connect to Cloud Storage
- USB Drives
- Map an App folder
- File Selection Mode
- Selecting Images in the Image Viewer
- Copying Files
- Drag and Drop
- AirDrop Files
- Copy Large files with macOS Finder
- Share Files
- Copy to iOS Clipboard
- eMail Files
- Download Files Using URL
- Bulk Rename - Add text to filenames
- Bulk Rename - Add Index or Counter
- Bulk Rename - Find and Replace
- Bulk Rename - Rename with Dates
- Bulk Rename - Rename using EXIF Data
- Rotate Images
- Convert Images
- Create Contact Sheets
- Rate Photos with XMP
- Remove GPS from Photos
- Edit IPTC Properties on Photos
- Slideshows
- - Chromecast Images
- - Airplay Photos
- Supported Music Types
- Play Modes
- Queueing Tracks
- Speed Up/Slow Down Playback
- AirPlay Music
- Chromecast Music
- Cast Music to Alexa Devices
- Recording Audio into FileBrowser
- Create Custom Tasks
- Monitor a Folder for a Keyword and Download Hourly
- Download PDFs from the Last 7 Days
- Trim PDF Pages
- Change IPTC Properties on Images in Bulk
- Rotate Images in Bulk
- Automated Backup of Video Files from a Chosen Folder
- Automate Backup and Deletion of Files Older than a Chosen Date
- Remove GPS from Multiple Photos
- Convert Images in Bulk
- Deleted Files
- Compare Files and Folders
- Siri Reminders
- Siri Voice Shortcuts
- QR and BarCode Support
- Face ID Logins
- Kiosk Mode
- Family Sharing
- FileBrowser Configuration Files
- Transfer FileBrowser Settings

Advanced
FileBrowser has so many advanced features such as Siri Voice options, create folder links as QRCodes, scan Bar Codes from yoru ERP system to navigate to folders. Add Face or TouchID to your FileBrowser connections.
Siri Navigation
User Siri with FileBrowser to quickly navigate folders or to set reminders with links into FileBrowser.
Siri Reminders
The Siri keyword "this" will associate FileBrowser's current document or Folder with the Siri reminder.
For example navigate to a folder or file and say "Siri remind me of this tonight" or "Siri remind me of this when I get home" and Siri will create a reminder linked to FileBrowser's current folder or document.
Voice Shortcut
Create a phrase to Bookmark a folder, and repeat this phase to Siri, FileBrowser will open, connect and navigate to your chosen folder.
QR and Bar Code Support
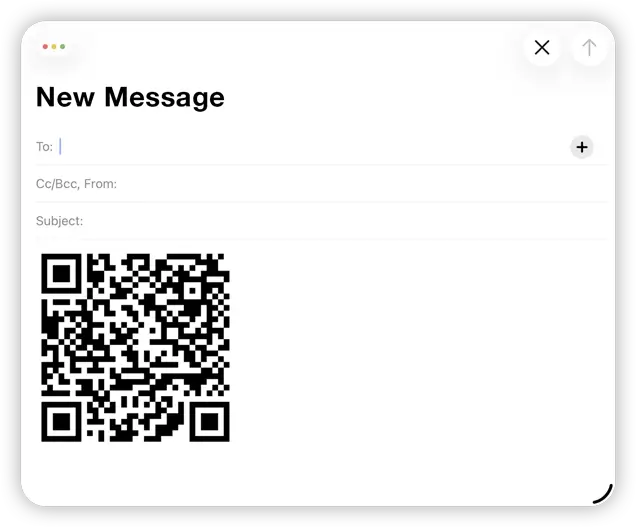
Create QR Codes
You can now use FileBrowser to track assets in your organisation. Perhaps you have banks of servers you need to identify or paper documents to locate in a directory. Print QR code labels on the assets and then find the corresponding server, folder or computer file instantly with FileBrowser's QR Code scanner.
You could also point to any folder or location on your servers.
Use FileBrowser for Education's QR Code scanner to make it easy for students to find their class or personal folder. Create QR codes with the app to print in worksheets or on wall displays so that students can scan them to open specific folders or documents.
Creating a Code
- Tap the Toolbar menu and select "Create a folder link".
- Then choose "Copy QR Code to Clipboard"
- Paste your QR Code into an email, document or use "Paste iOS clipboard" to save the code directly to a folder.
Scan QR Codes
- Use the camera to read a QR Code and jump to a folder.
How Does it Work?
- Tap the Bookmarks Icon.
- Tap the QR Code icon and scan your QR Code and tap Use.
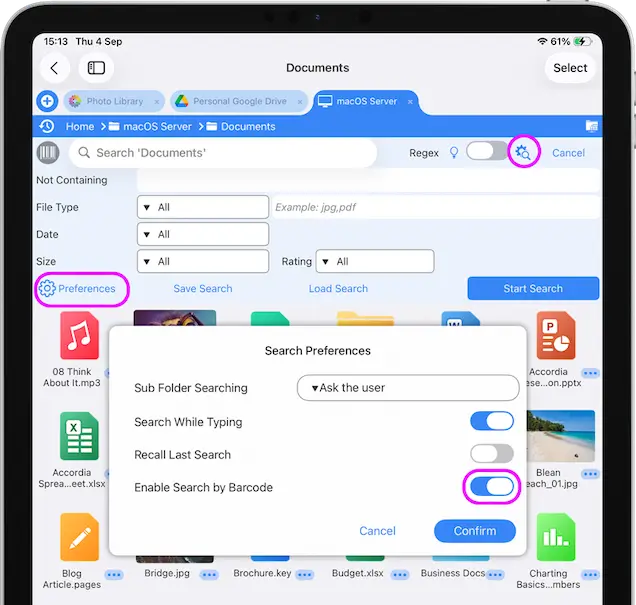
Barcode Search
Your ERP system may already create barcodes that identify files or folders on the company file system. Tap the search button in FileBrowser Professional and then the barcode button to scan and search.
Enable "the Barcode Button on Toolbar" setting: Tap the search icon then expand the advanced settings, then select "Preferences" and turn on "Enable Search by Barcode".
QR and Bar code features are only available in FileBrowserGO and FileBrowser Professional.
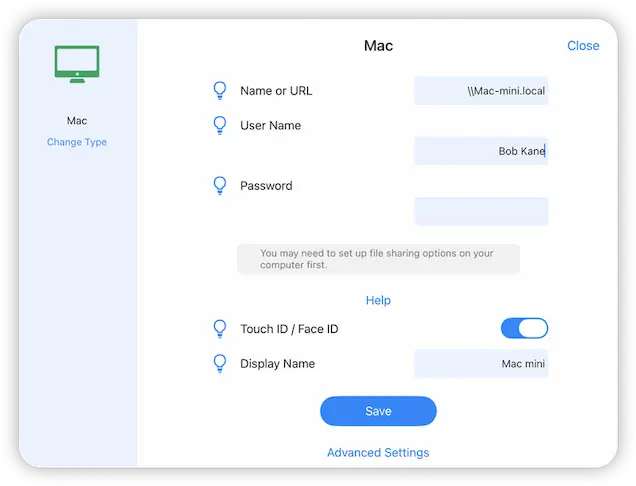
Face ID Logins
With Face/Touch ID you can add an extra level of security when accessing your machines.
- From FileBrowser's home screen
- Tap the actions menu on the machine/server and select "Edit".
- Then enable Touch ID / Face ID and tap "Save".
Once activated, your face or fingerprint will be required to access your stored credentials to connect.
Face and TouchID are only available in FileBrowserGO and FileBrowser Professional.
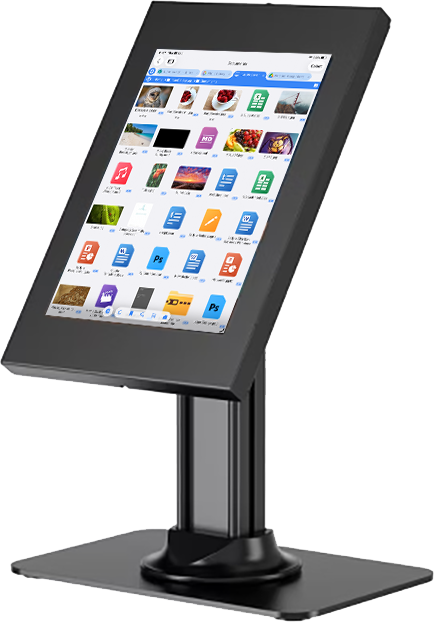
Kiosk Browser Mode on iPad
Turn your iPad into the perfect Kiosk device for your stand with FileBrowser Professional. Lock down file viewing to a specific set of folders and files such as pdfs, photos or videos of your products. Restrict editing and deleting of files also.
Kiosk mode is a combination of a few settings to get the best result:
- In "Config -> Admin Settings -> Startup Preferences", turn on the "Kiosk mode" setting. This will replace the homescreen with your Bookmarks.
- Set an Admin Password (in "Config -> Admin Settings -> Admin Password") to prevent users opening the locations tab or gaining access to configuration details etc.
- Set bookmarks or quick access tabs to the locations that users need. This will be the way they navigate to their folders.
- Restrict the actions they can do by turning features off in "Config -> Admin Settings -> Features".
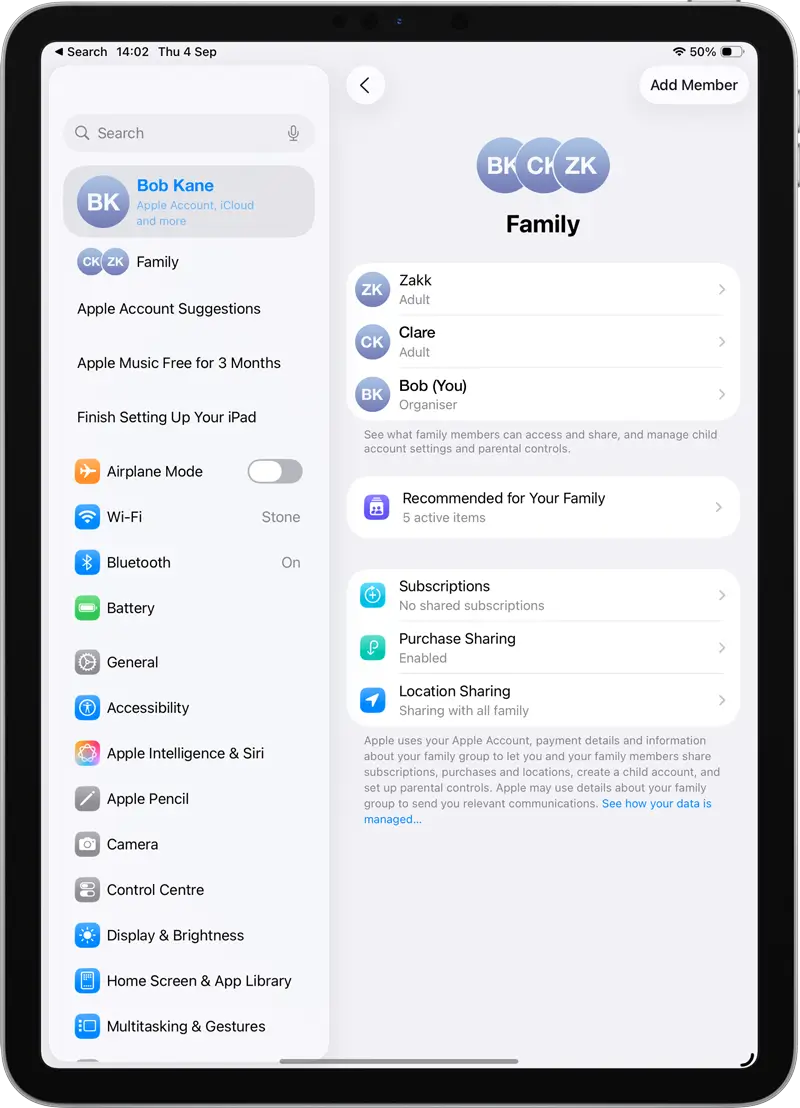
Family Sharing
To enable this feature, you need to turn on Family Sharing.
Enable Family Sharing: In iOS "Settings > Apple ID > Family Sharing". Under the Family Sharing tab, you can add your family members with valid Apple IDs.
Subscription Family Sharing Settings
You can also view the Apple Subscriptions that you can share including FileBrowserGO. Once you have added your family members as needed, view the "Subscriptions" tab on the Apple ID menu. There you can toggle "Share New Subscriptions" to automatically share new subscriptions with family members or you can select the FileBrowserGO subscription from the list and toggle "Share with family".
Unsure which version of FileBrowser is for you? Check out our comparison page.